When I switched WordPress providers, many of the pictures did not import properly. You may want to view the old site’s post instead.
Portions of the following essay, the pictures in particular, have previously appeared in my Facebook feed. If you’ve read those status updates, the only reason to read this blog post is to immerse yourself in my terse, concise, non-repetitive, and direct writing style in order to bask in its brevity.
The incentive
I have games that include miniature figures. Off the top of my head, these include Talisman and Fortune and Glory. I never had any desire or incentive to paint those figures.
- The figures in the above games are small and lack detail. They have more visual appeal than simple plastic counters, but that’s about it.
- The above games are not popular with my gaming groups. Talisman is seen to be too simple for a game of its size and length. Fortune and Glory is a “press your luck” game which is not a popular style among strategy gamers.
I purchased Mysthea on the basis of its Kickstarter campaign. I got it for its design and mechanics. I knew it included miniatures, but until I saw them I didn’t realize how much their size and detail screamed “paint me!” A couple of experienced miniature-figure painters posted their work on BoardGameGeek:
By pecktec:
/pic4618489.jpg "pecktec's Mysthea minis")
By rulzac
/pic4623739.jpg "rulzac's Mysthea minis")
So I knew it could be done. I knew I couldn’t do as good a job as the painters above, or someone who had gained experience by painting entire Warhammer 40K armies, but I hoped for something that looked better than simple gray resin on the colorful Mysthea game board. A discussion on BoardGameGeek gave me an initial direction to follow.
History
I started almost from zero. I had painted some minis in the mid 70s, but they were clumsy attempts. Here’s the only one I still have from those days. I think it’s supposed to be a Kobold.
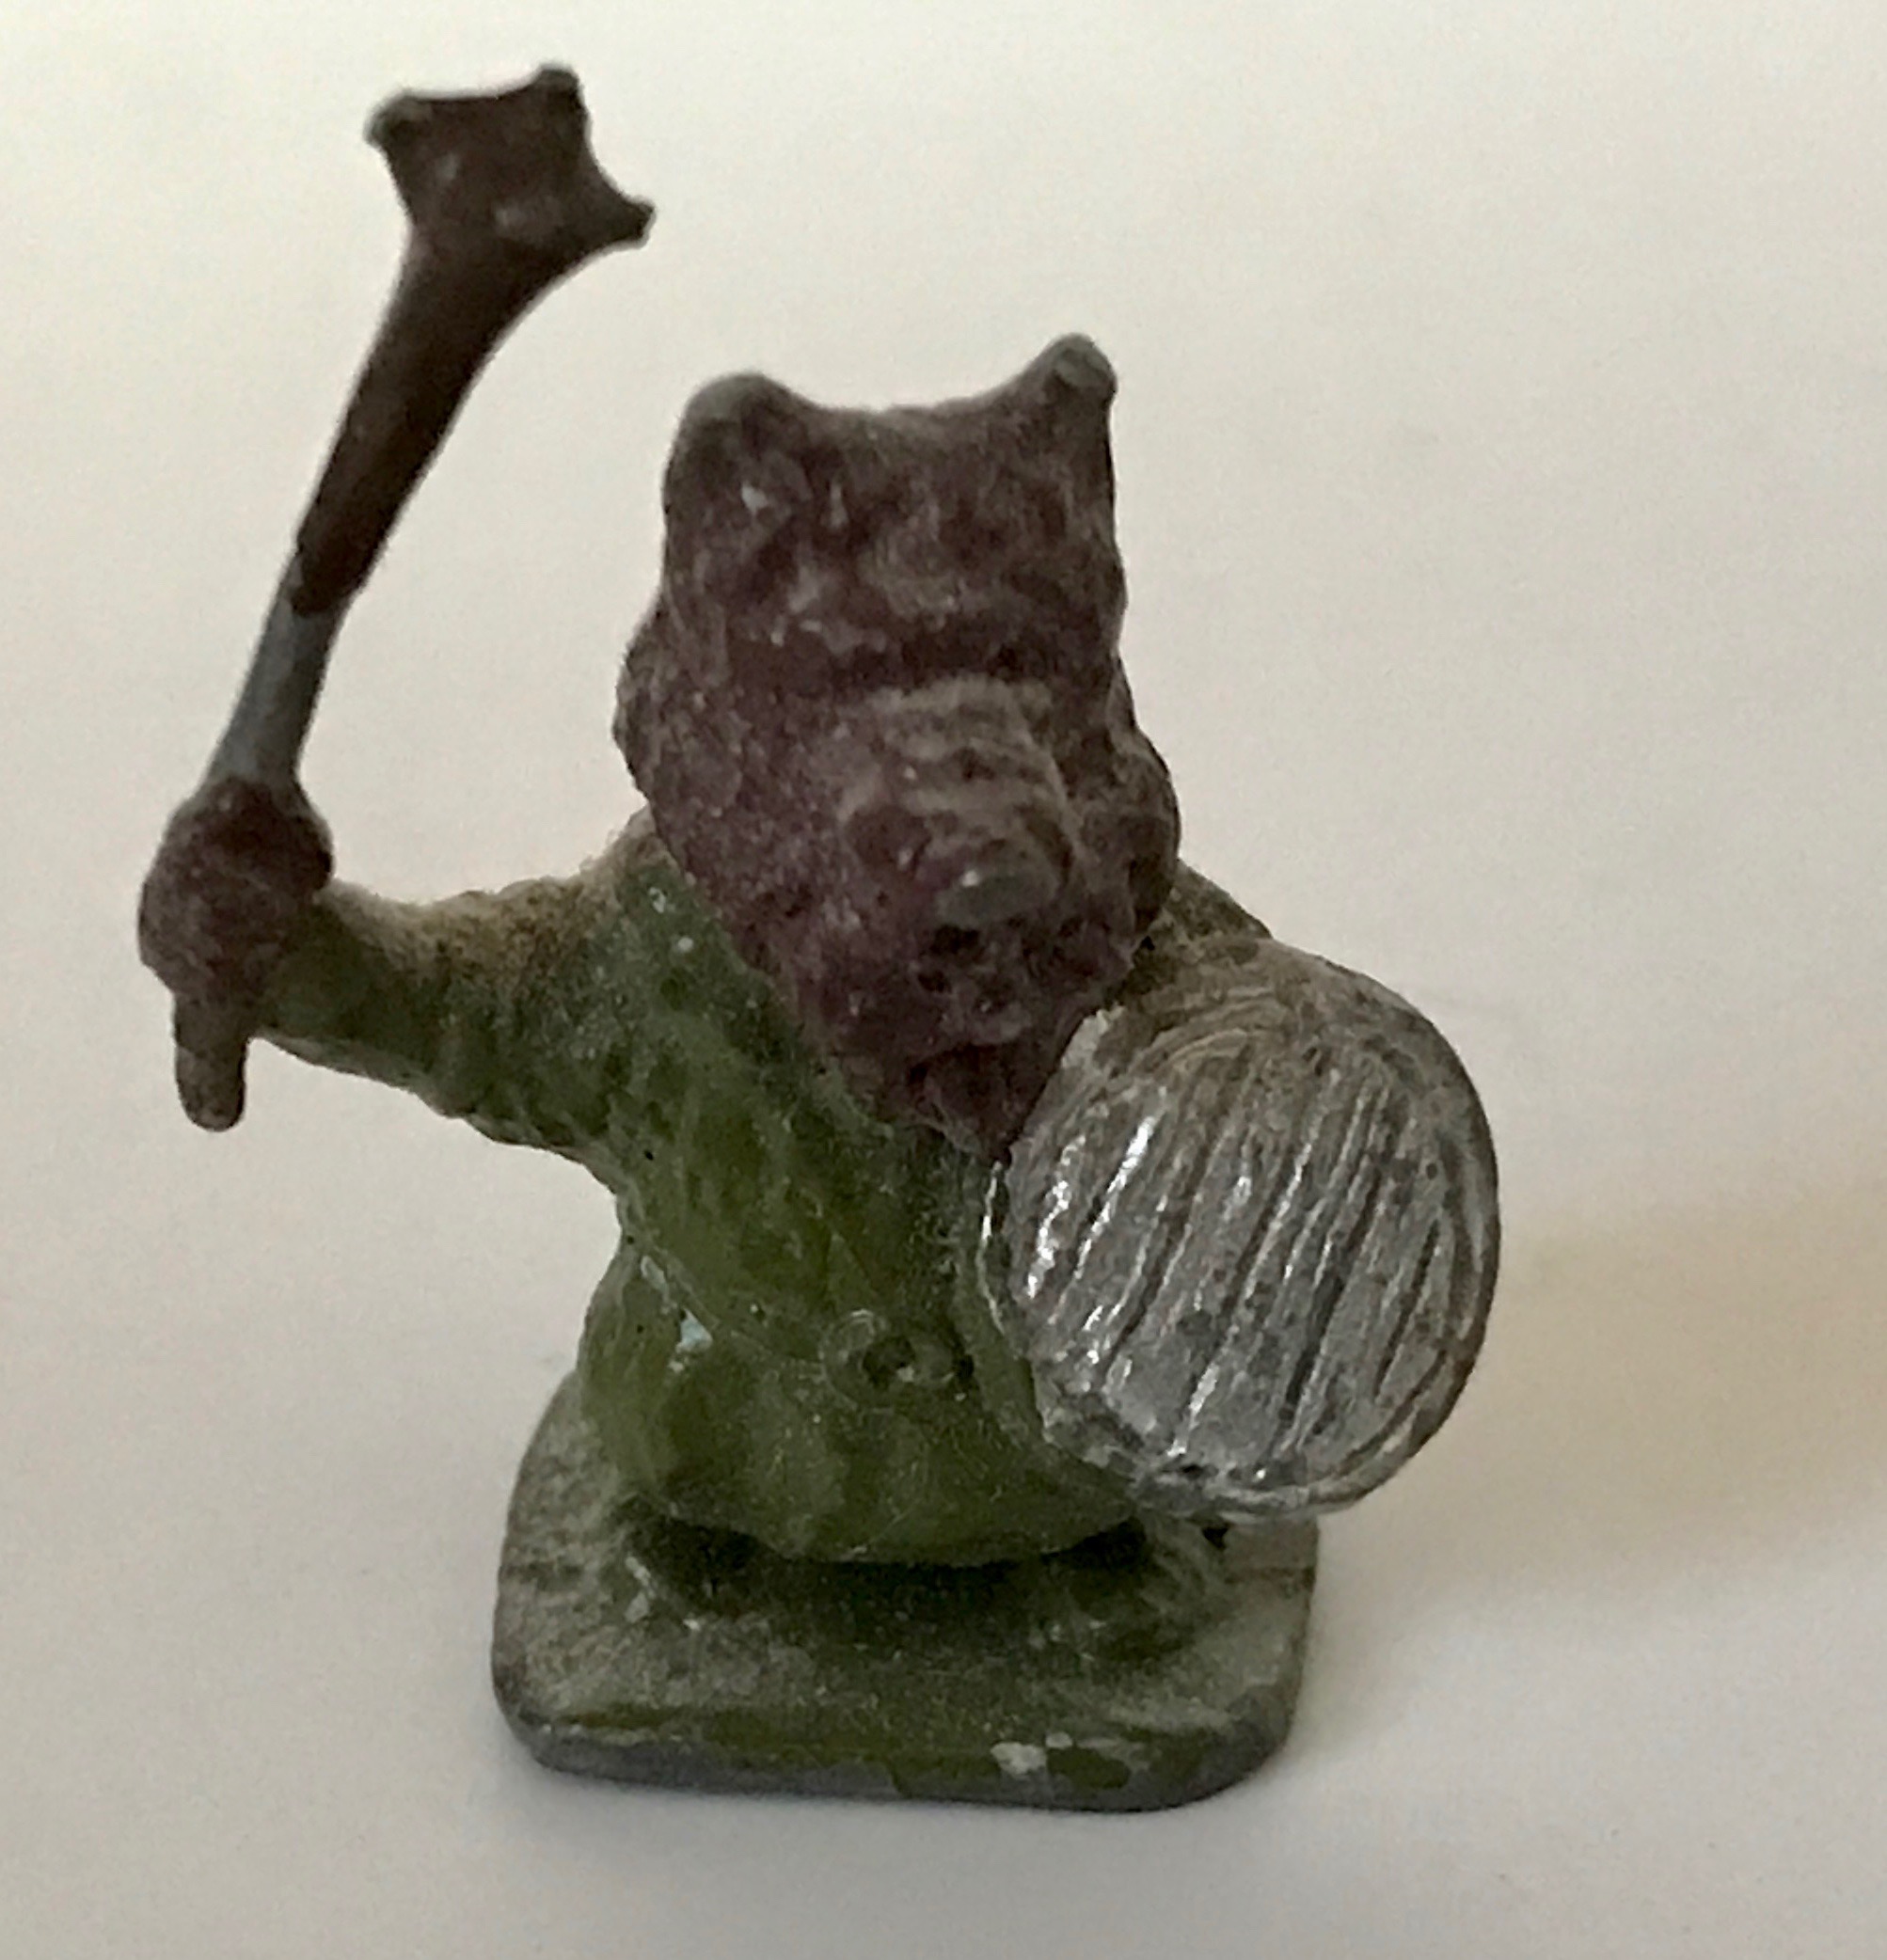
I’m pretty sure I gave all my other painted minis to Daniel Holzman-Tweed in the 80s. I could have sworn I kept some paint and brushes, but I hunted through my various toolkits and craft boxes and found nothing. I probably gave those to Dan as well. Given the crudeness of my painting, I hope he’s thrown out those minis by now.
When I clumsily painted that Kobold (or whatever it is), I was in my teens. My manual dexterity was better than it is now. I also had two working eyes, each one of which had better vision than I do at present. I looked at that little old mini and despaired.
On the other hand, the hobby of painting miniature figures has grown tremendously since the 70s. There are now tools and technologies available that I did not have then. In the 70s, there were no web sites or YouTube tutorials I could consult. I was effectively a n00b, but I could be a better-prepared n00b in 2019 than I could be in 1977.
A disappointing beginning
When I decide to embark on a new project involving something for which I have no skill, I have a strategy that seems appealing and never works: I overspend. I did it when I built the gadget to control my air conditioner via HomeKit, and I did it here. I won’t give any itemized lists, but whenever I describe a dead end you may assume I regard it as money wasted.
My first question: Where to start? As I did my initial research, I learned about the Reaper Learn To Paint Bones Kit. As the name suggests, this was supposed to contain supplies and instructions to teach beginners.
I had a miserable experience with this kit. I won’t detail the problems here, because I have a vague plan to write up a full description for both this blog and for an Amazon review. My first attempt applying a brush to one of the included minis ended badly. I overcame my despair and forced myself to complete the mini, following the instructions as slavishly as I could. Instead of the great-looking mini that I saw in the instruction booklet, I got this:
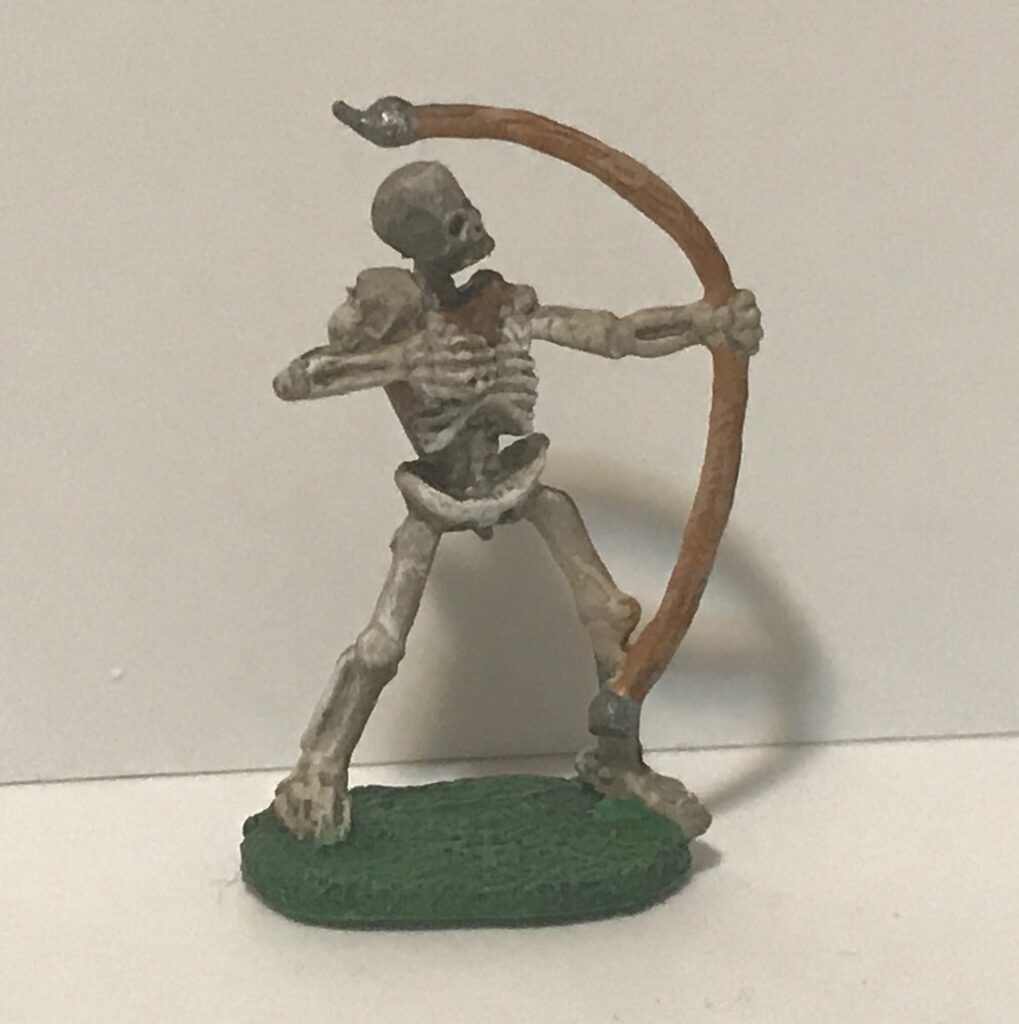
My conclusion was that I was a clumsy oaf who couldn’t follow directions.
I did not give up, mainly because of YouTube. I had watched a few videos on mini painting. YouTube then added more mini-painting videos to my Recommended list. So I continued to watch instructional videos even after my bad experience with the kit.
I came to understand the problems I had were not entirely due to my physical limitations. The kit had included cheap brushes and had not provided adequate instructions for their care. The included paints needed to be thinned, which had not been mentioned in the instruction booklet at all. For a few weeks after I started working with minis again, I was convinced I couldn’t drybrush; it turned out that the kit taught a drybrushing technique that didn’t work for me, but there were other methods out there.
I still have to give some credit to the Reaper Bones Kit. It provided me with a starting batch of paints which proved useful later in the project. There are painting tips that begin “Use an old junk brush for this” and the brushes in the kit became my junk brushes. The techniques described in the kit (basecoat, wash, drybrush basecoat, drybrush highlight) are important in mini painting, and in time I used a version of them in some places. But I didn’t do it the way the kit taught.
The airbrush
I eventually learned a mini painting technique that worked for me. I’ll describe it in detail below. Before I do that, I want to focus on an important tool for that technique: the airbrush.
I’d played with an airbrush once before, at an informal airbrushing class. The experience was not enlightening. I had not felt I had control over what was going on. Yet I needed an airbrush to shade my minis.
I consulted with my friend (and talented artist) Vann. (If you click on that link, you’ll see human models that he’s both hand- and air-brushed; I found that his advice translated to plastic fantasy miniatures.) After getting his advice and searching on the web, I eventually decided on the PointZero Airbrush Airbrush Kit. Vann agreed that, though cheap, it would be adequate for what I planned to do.
The PointZero kit included a compressor and three airbrushes. It was overkill (or so I thought) since I only needed one airbrush, but the other available kits that had only one airbrush either cost much more or did not include a compressor. To make it clear: an airbrush needs a source of compressed air; you can use a compressor or a tank of compressed air, but an airbrush alone does nothing. The PointZero kit cost $100 and included everything needed, including a regulator for the compressor and a hose to connect it to the airbrush. For a sense of scale, it’s not unusual for a professional to spend $300-$1000 on an airbrush alone.
Despite the difficulties I describe below, I think it was a good purchase. However, I had the luxury of consulting Vann when I got into trouble. Your mileage may vary.
At the same time I ordered the airbrush, I got an airbrush cleaning kit, airbrush cleaning fluid, and airbrush flow improver. All of these proved useful in the project. I also purchased airbrush thinner, but that had a very strong odor and it turned out that I never used it.
As these items arrived in the mail and looked over all the included documentation, I became aware of a peculiar facet of the airbrush world: the instructions include little practical information about the care and use of airbrushes. The PointZero kit included a DVD, but its videos were focused on industrial-level airbrushes. It also included links to instructional PDFs, but they were mostly oriented towards safety and were very generic.
The best advice for airbrushing came in a pamphlet that accompanied the airbrush cleaning kit. But while this gave nice lessons on using the airbrush they contained nothing about how to use the cleaning kit!
In the end, most of the advice on practical use of my airbrush came from Vann, supplemented with a few web sites and YouTube videos.
After using the airbrush a few times I became more safety conscious. Here I am wearing a respirator and safety goggles. They were probably unnecessary, but my health was becoming worse as this project went on and I didn’t want to add to my medical woes.

Following Vann’s advice, I set up an airbrushing station on top of my stove. This was not problem for me, since I rarely use it. (I’m a bachelor. I microwave.) The reason for setting up on a stove is that I could turn on the stove’s ventilator fan and blow out any airborne spray from the airbrush.
The first time I airbrushed, I got into trouble. The paint stopped flowing through the brush. I assumed I had a clog. The videos showed users casually disassembling their airbrushes whenever a problem occurred. The airbrush came with a parts schematic, so I went ahead and took it apart. Not only could I not find any clog, but I couldn’t put it back together. I bent the tip of the airbrush’s needle while trying to reassemble the airbrush incorrectly.
I sent a message to Vann, saying that as I predicted I broke the airbrush. He was kind enough to do a Facetime call and guide me. I was lucky: Vann not only had years of experience working with airbrushes but teaching them as well. Thanks to him, I was able to put the airbrush together correctly. He assured me that bent needles are a common event when working with airbrushes, and that he’d seen and worked with needles that were far worse off than mine.
Then, as he offered and I requested, he guided me through a complete disassembly of the airbrush again. It’s common to take an airbrush apart to diagnose problems and to clean it, and we wanted to make sure I knew what to do. Everything was fine until I removed the airbrush sprayer with a custom tiny wrench. When it came to reassembly, I could not screw the sprayer back on again. The sprayer (or nozzle) is s tiny part that I found hard to grip in my fumble fingers.
Vann was patient, staying on the Facetime call with me for something like 45 minutes as I tried to get the sprayer back on, dropping it, finding it with blurry vision, and starting again. Finally we agreed to call it quits. He suggested I ask a mutual friend of ours with airbrush experience to stop by and screw in the sprayer.
The day after the call, I examined the unscrewed sprayer more carefully and compared it with the parts schematic of the airbrush. The reason why I couldn’t screw the sprayer back in again is that I broke it when I originally unscrewed it.
Fortunately, these types of events are also common with airbrushes. I ordered a kit of airbrush replacement parts. The replacement sprayer fit perfectly.
While I waited for the kit to arrive, I continued to airbrush minis using one of the other airbrushes that had come with the PointZero kit. It was smaller than the one I broke so it wouldn’t hold as much paint, but otherwise worked fine. I was careful not to break this one! I was lucky that I’d decided to get a kit with more than one airbrush, otherwise I would have had to (horror of horrors!) wait for the replacement part.
Technique
The chief problem I had when attempting to paint the minis in the Reaper Bones Kit was in painting small areas on the surface of the mini. I simply did not have fine enough brush control. Eventually during the course of the project I got better at it, especially after I understood about thinning the paints, but initially I needed a method that could I could apply without detailed brushing or highlighting.
I settled on technique that I only recently learned is called “pre-shading.” First I applied a zenithal prime to the mini using the airbrush. Then I used a wash to give the mini its overall color.
If you’re not into model painting, I’ve thrown a couple of terms at you that you’re probably not familiar with:
- “Zenithal priming” is a way to apply paint such that it creates an effect like overhead lighting. Here’s a couple of web pages that describe the technique (1 and 2); a search on “zenithal prime” will fetch many more. To summarize: Spray a mini all over with black. Then spray it again, this time in gray, holding the airbrush at a fixed 45° angle. Finally spray the mini with white, but hold the sprayer at a 0° angle with respect to the top of the mini.
- A “wash” is a very thinned paint. Instead of just sticking to the surface that you apply it to, it’s intentionally designed to flow, depositing inks in the nooks and crannies of the mini. The net effect is to further shade the deeper parts of the mini, and highlight (by contrast) the raised parts.
Here’s an example of the process. These two pictures show one of the minis that came with the Reaper Bones Kit. The first shows the mini zenithal primed. The second shows that same mini washed with a purple tint.
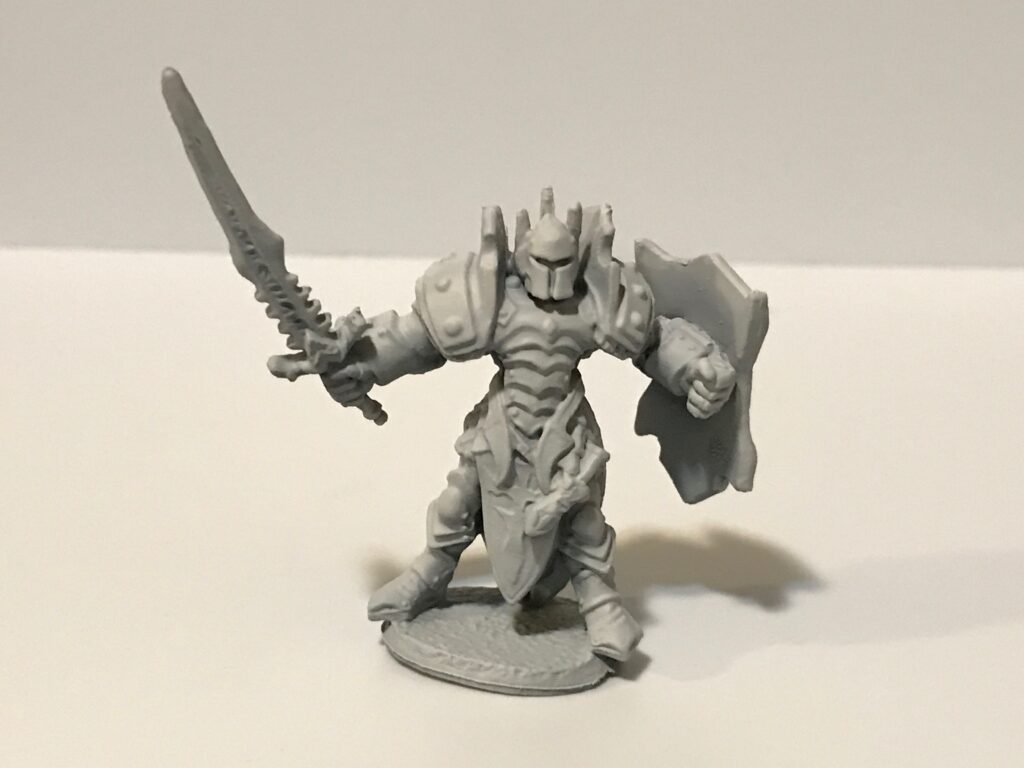
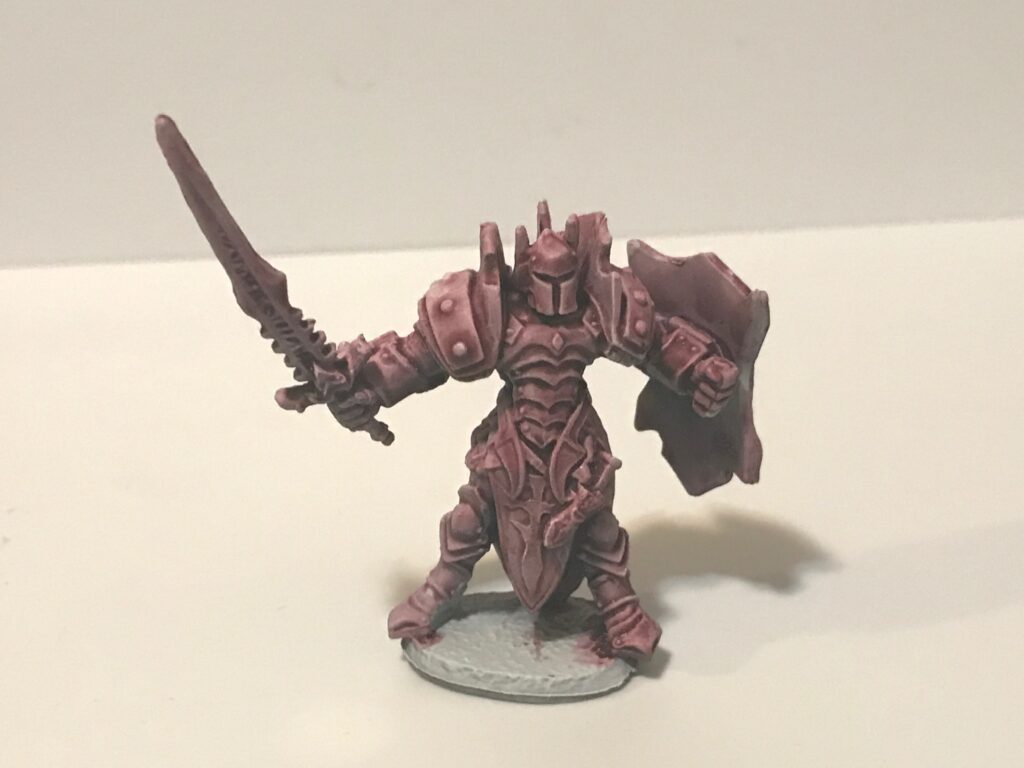
Unfortunately, I did not take a “before” picture of the unpainted mini. It may be hard to tell, but the shading on the mini does not come from my kitchen light, but is imposed by the zenithal priming. Note how the crevices are darker in the washed mini.
Testing
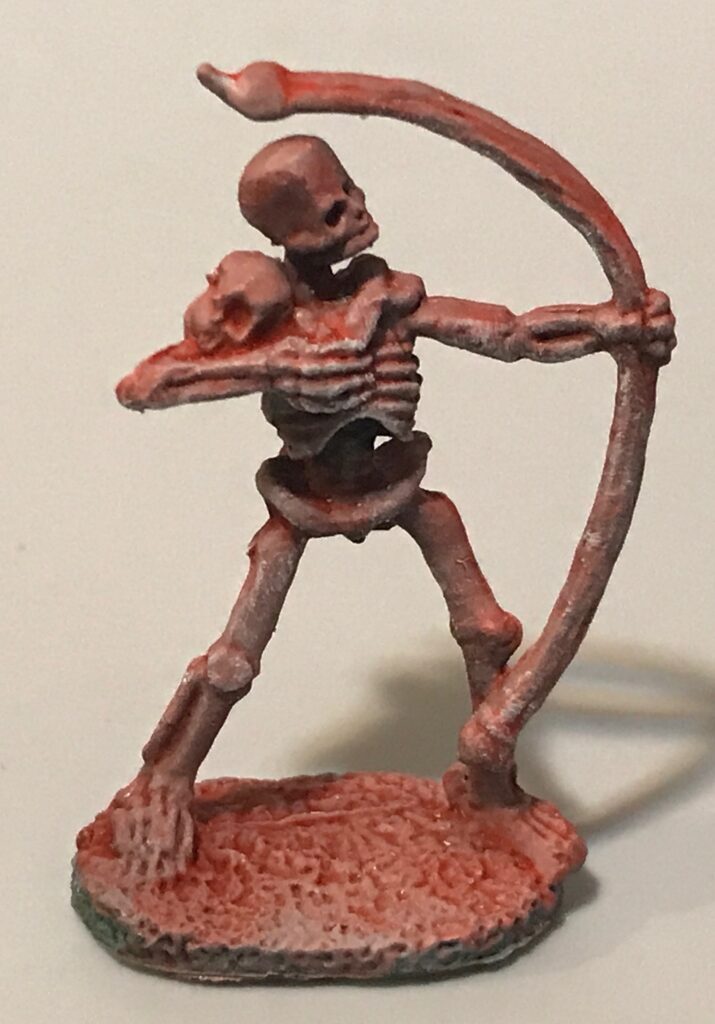
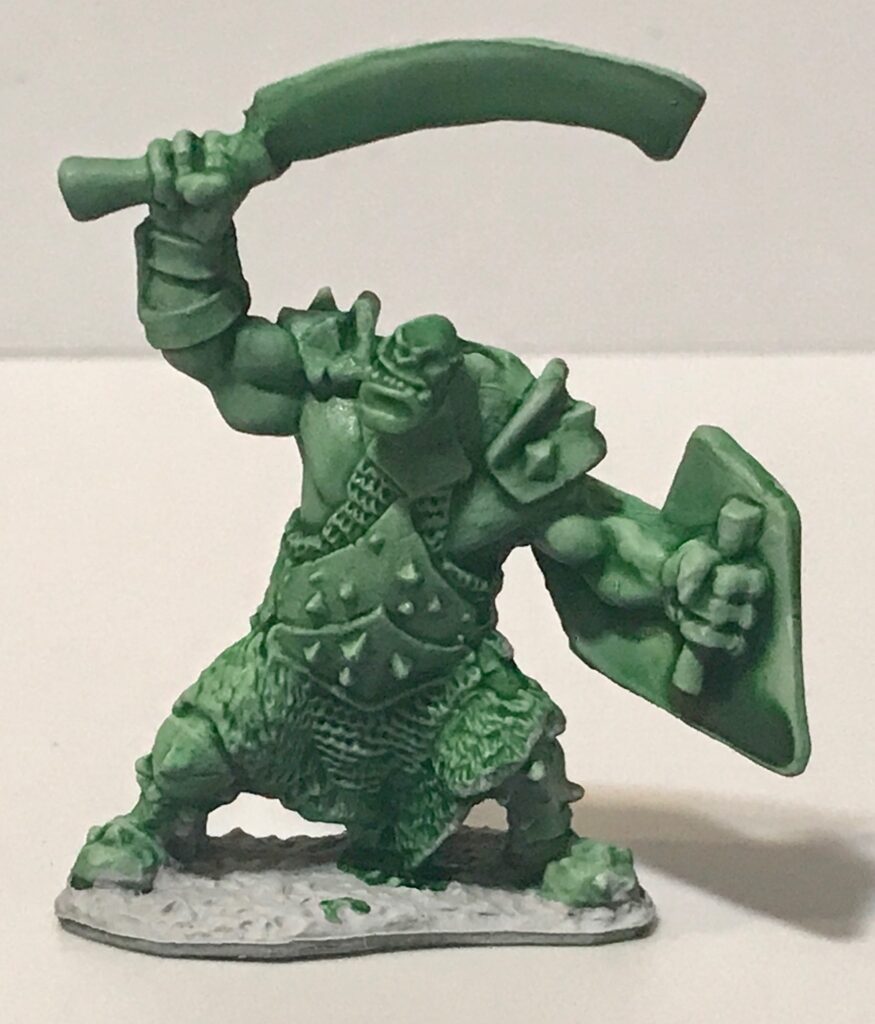
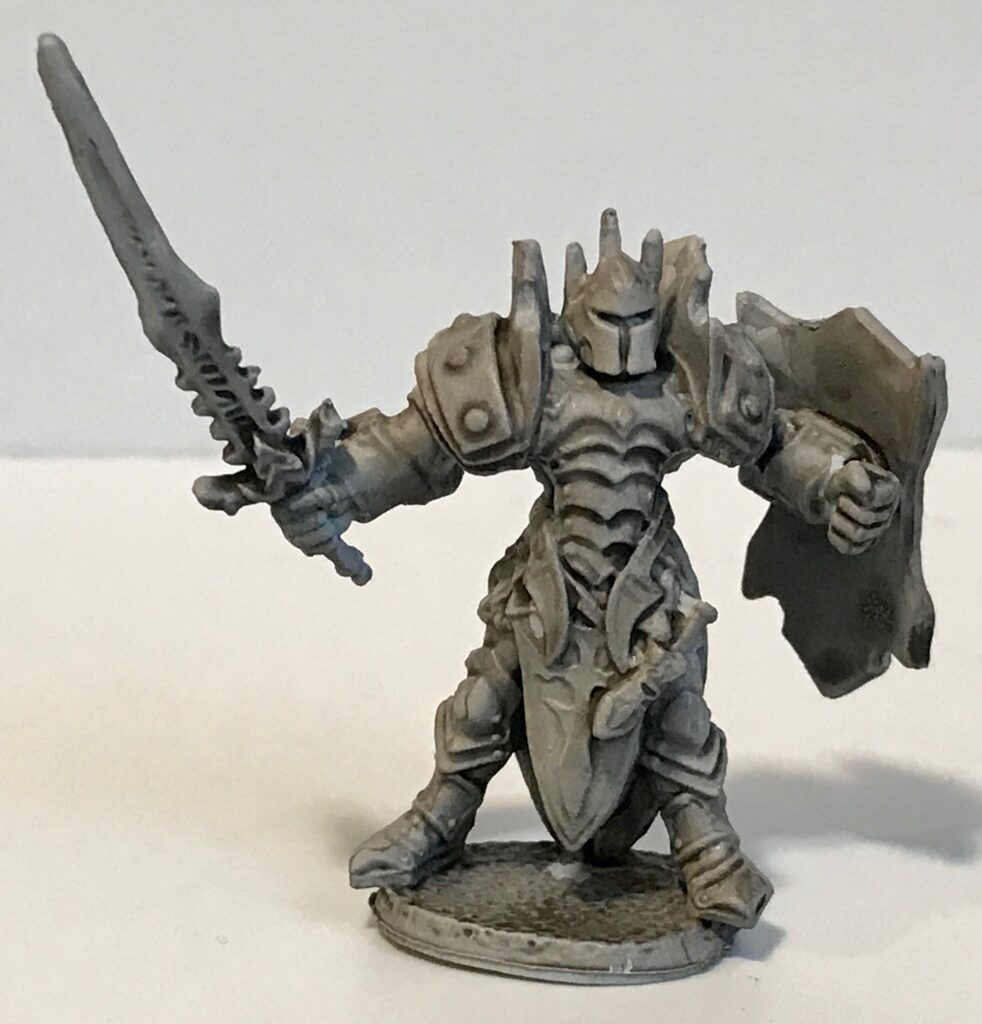
I didn’t want to start painting the Mysthea minis right away. Those minis would be hard to replace, since the publisher does not have any spare parts in stock yet. I therefore tested the technique on the only other minis I had, those from the Reaper Bones Kit. Here’s a test of the red, green, and black washes respectively over zenithal priming.
I had more wash colors I wanted to test. It would have been better to test on actual minis, but I wanted ones that were big enough for me to practice on any details and didn’t have annoying features like the skeleton’s bow or the orc’s sword that I’d have to paint around. Until I found suitable minis, I used twenty-sided dice instead; I had plenty of them, some dating back to the 70s, and their edges were so worn that I knew I’d never use them again for anything else. Yes, you’re looking at zenithal-primed and shaded D20s.

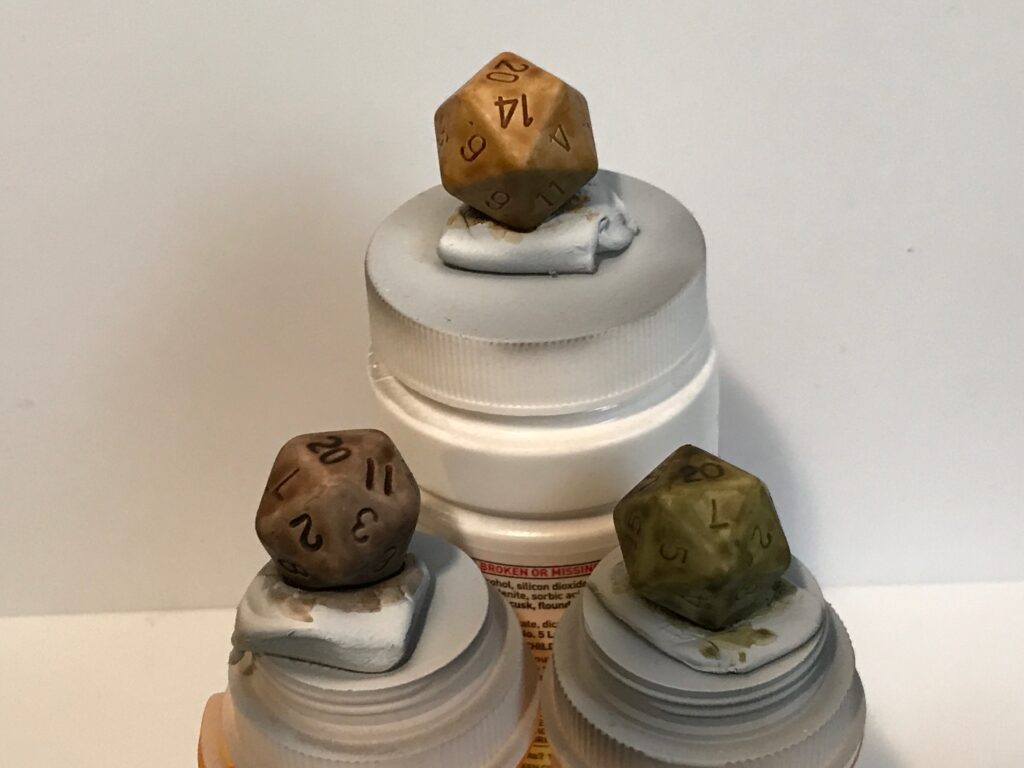
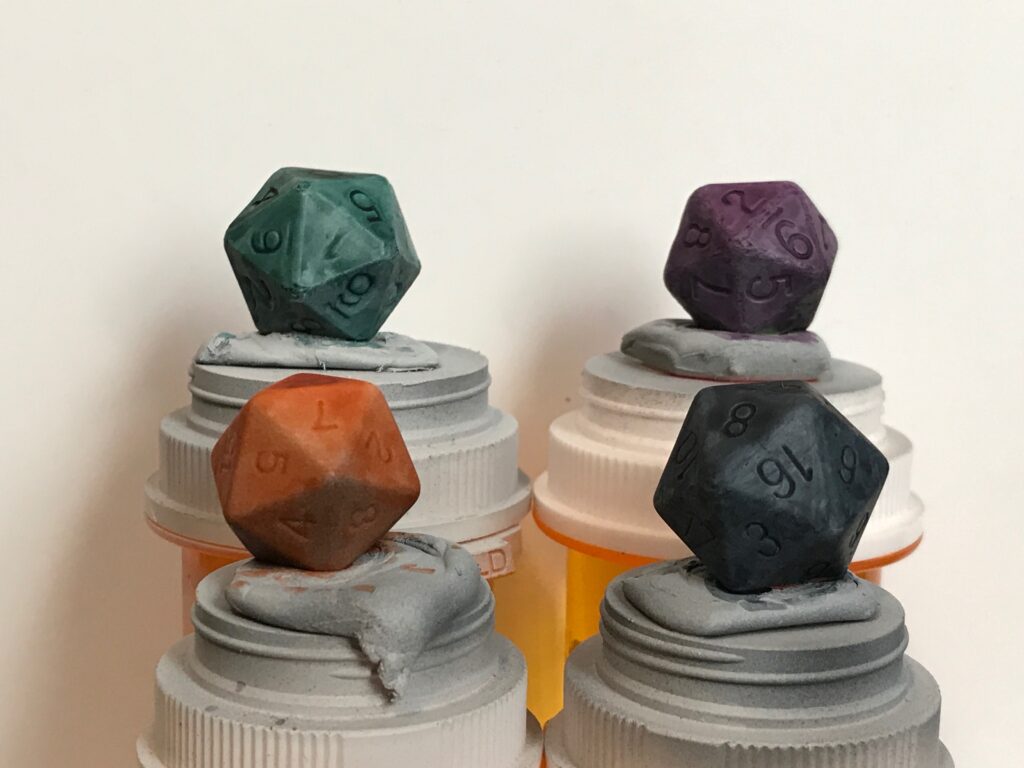
You can see in these photos that, while painting the minis, I held them with poster tack on the top of old pill containers. I filled the containers with water to give them some heft and keep them from tipping over.
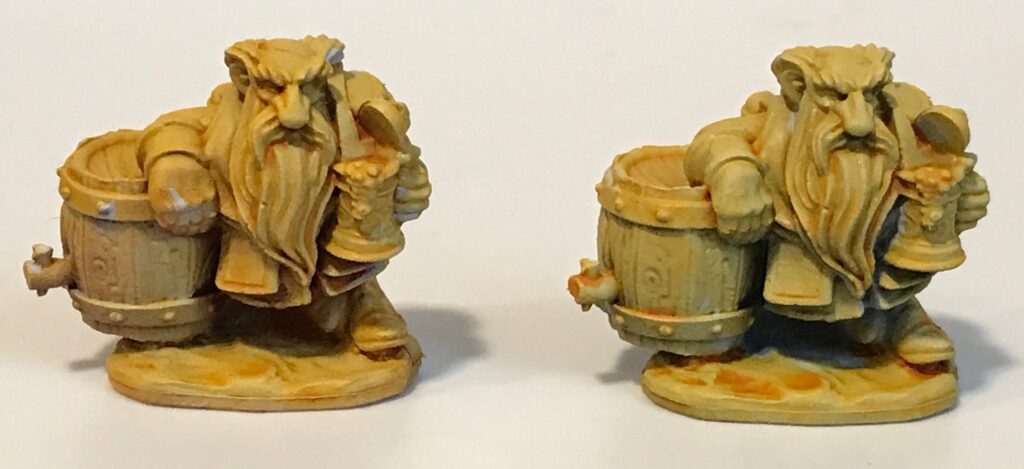
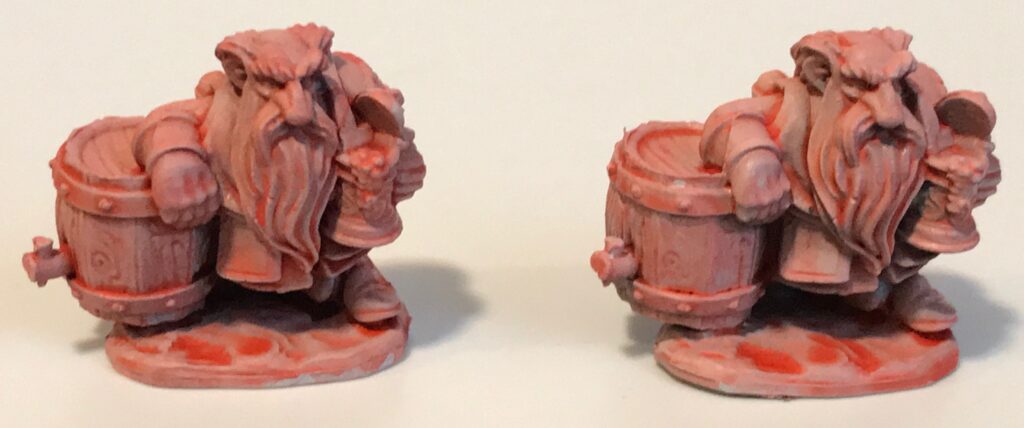
Finally I got some real minis to test on that satisfied my requirements: nice details for painting and drybrushing, not too small for me to handle. I called them my “standard dwarves”. I ordered four of them, and later wished I’d ordered more. Here’s one of my tests with the dwarves, as I compare the effect of different zenithal priming base layers combined with yellow and red washes.
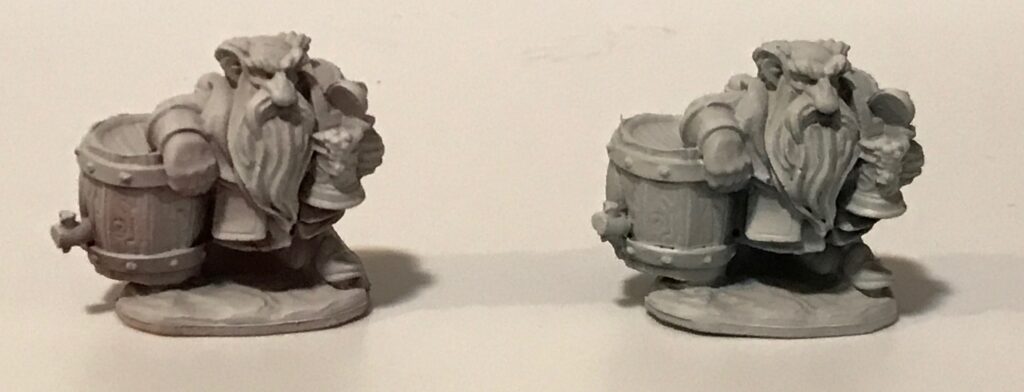
Even after I started painting the Mysthea minis, the standard dwarves were useful to test combinations of paints. I may buy more dwarves for future projects… or I may keep repainting the ones I’ve got.
Paints
As I noted above, the hobby of model painting has grown considerably since the 70s. I don’t remember what paint I used for that silly Kobold (if that’s what it is), but I probably didn’t have too much of a choice. Now a single manufacturer like Vallejo might have hundreds to choose from, with variations in color, texture, and purpose. I knew I was going to stick with acrylic paints for miniature figures, which doesn’t really narrow the field at all.
I knew the minis had to be primed. “Primer” for models means the same thing as it does in house-painting: an undercoat that helps the paint adhere to the surface. Since I knew I was going zenithal all the minis, I used primer for the purpose. I purchased white, gray, and black primer. You may have noticed in captions for the dwarves above that I experimented with brown primer, but in the end I did not use it.
Some paints had come with the Reaper Bones Kit, and I’d still use them. For the other paints, I decided to go with Vallejo. The general consensus I found that they made good-quality paints at a reasonable price. I only had to purchase red and orange fire; the former because there was no red paint in the Reaper Bones Kit, the latter because I wanted a brighter orange than I could get from mixing red and yellow.
For the washes, I went with Citadel Shade Paints. Citadel is part of Games Workshop. Their paints are designed for their minis (notably Warhammer 40K), but that would have little effect on what I planned to do. I found a great color guide to help me choose which washes to get.
Experts might disagree with my choice of Citadel washes. In general, Citadel paints are considered expensive for what they deliver. Also, it’s not that hard to make your own washes: just add enough water to your paint. But I wanted reproducibility in my shades of wash, and I was willing to pay to get it.
Let’s get to it
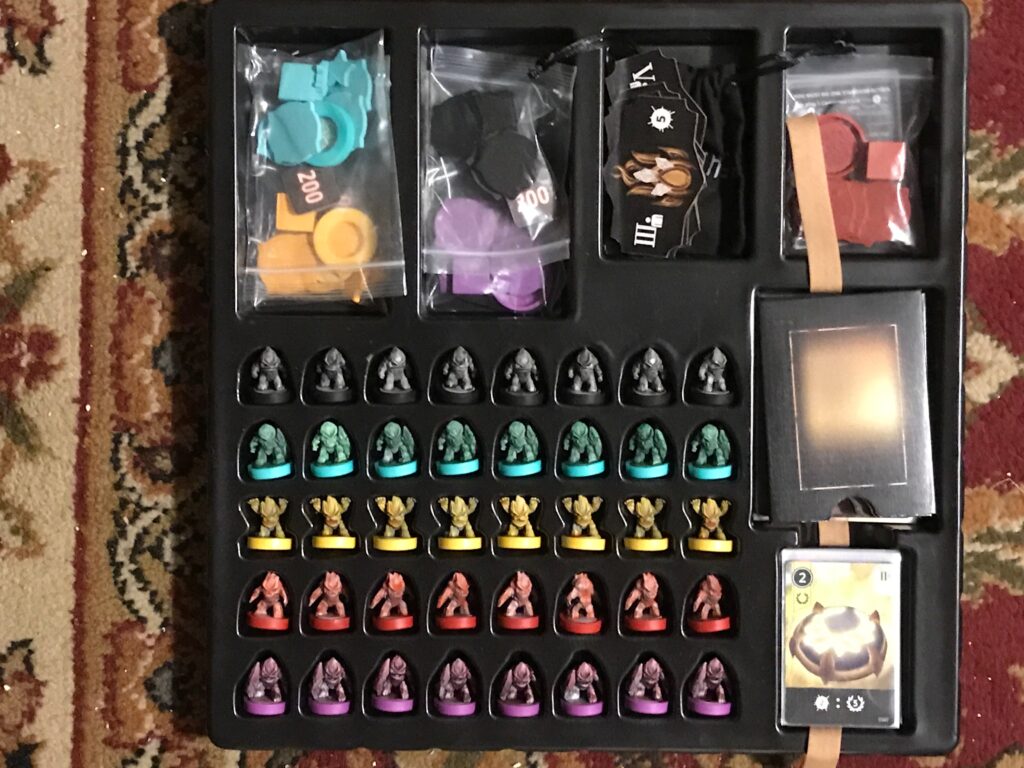
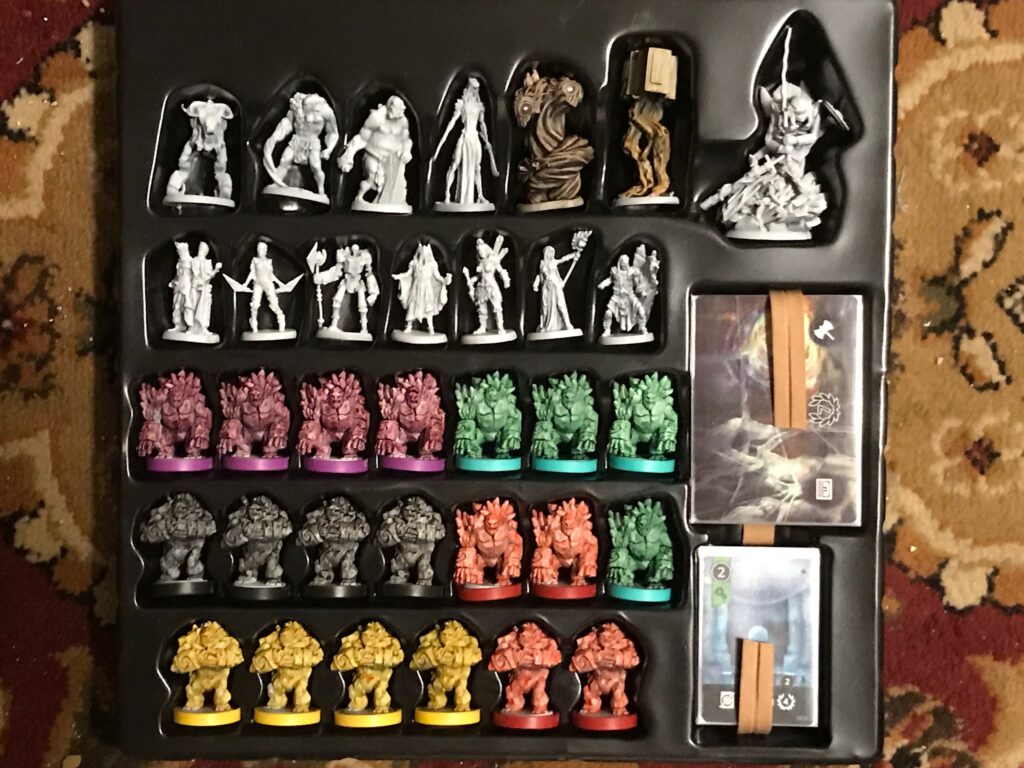
There are four classes of minis in Mysthea: Golems, Troops, Monsters, and Champions. The first two are “armies,” with lots of identical units. Each Monster and Champion figure is unique.
The “armies”
I started with the Golems and Troops. There can be up to five players in Mysthea, and each chooses their player color. I wanted to paint the armies in the player colors. I started with the Golems, which were larger and therefore easier to handle. Also, the rocky nature of their design made the washes fill in their details beautifully. For these, I have “before” and “after” photos so you can see the effects of each stage: unpainted, zenithal primed, washed (front and rear).


If you’re sharp of eye and quick of mind, you may wonder: The Mysthea game comes with colored bases, so you can tell which Golem or Troop is assigned to each player. But now the minis have been painted. Why keep the bases on? Answer: Because the minis are hard to remove from the Mysthea box’s trays without those bases. The minis are easier to handle if I paint them then put the bases back on.
Once I painted the 20 Golems (four for each player), it was time to paint the 40 Troops (eight for each player). Here I show examples, with a Golem in the background for a size comparison.

It was at this point that I finally got a handle on drybrushing, mostly from watching more videos and practicing on the standard dwarves. (The secret is to make the final swipes on your arm, until the paint no longer flows into the cracks of your skin.) I decided to drybrush the backs of all the Golems. However, the effect was barely noticeable. The drybrushed Golem is on the left; original is on the right.

I believe what happened is that since the wash left the tips of the rocky surface pretty light in the first place, adding white-based highlights didn’t make much of a difference. As we’ll see, I got better at contrasting highlights by the time I got to the Champions.
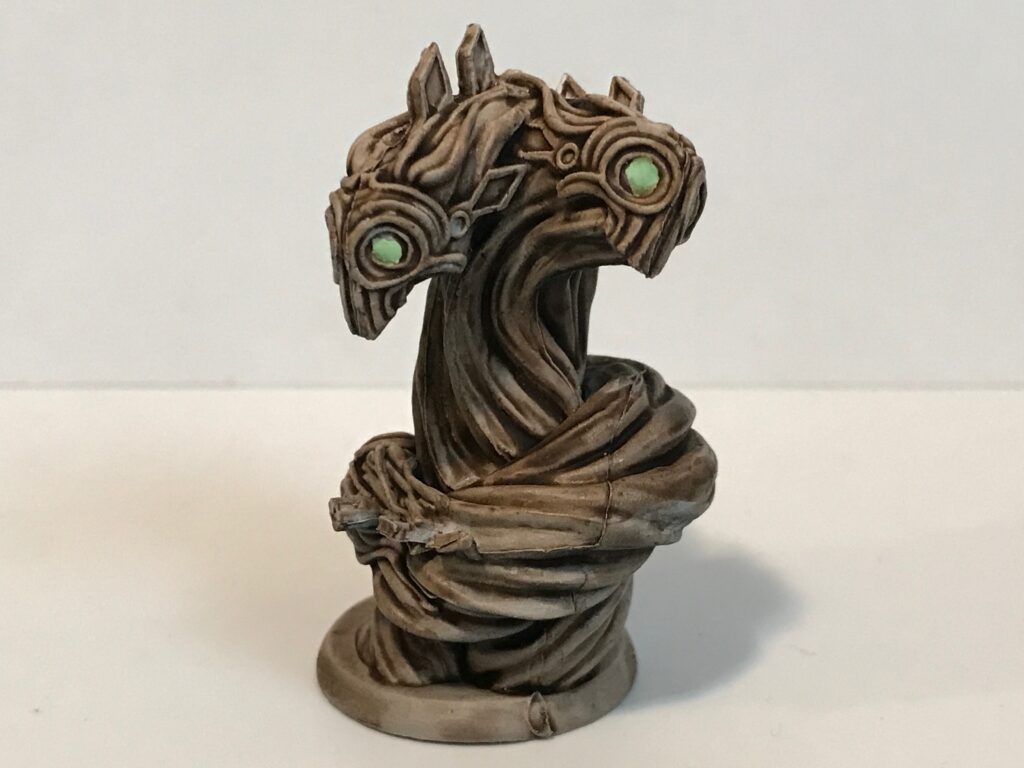
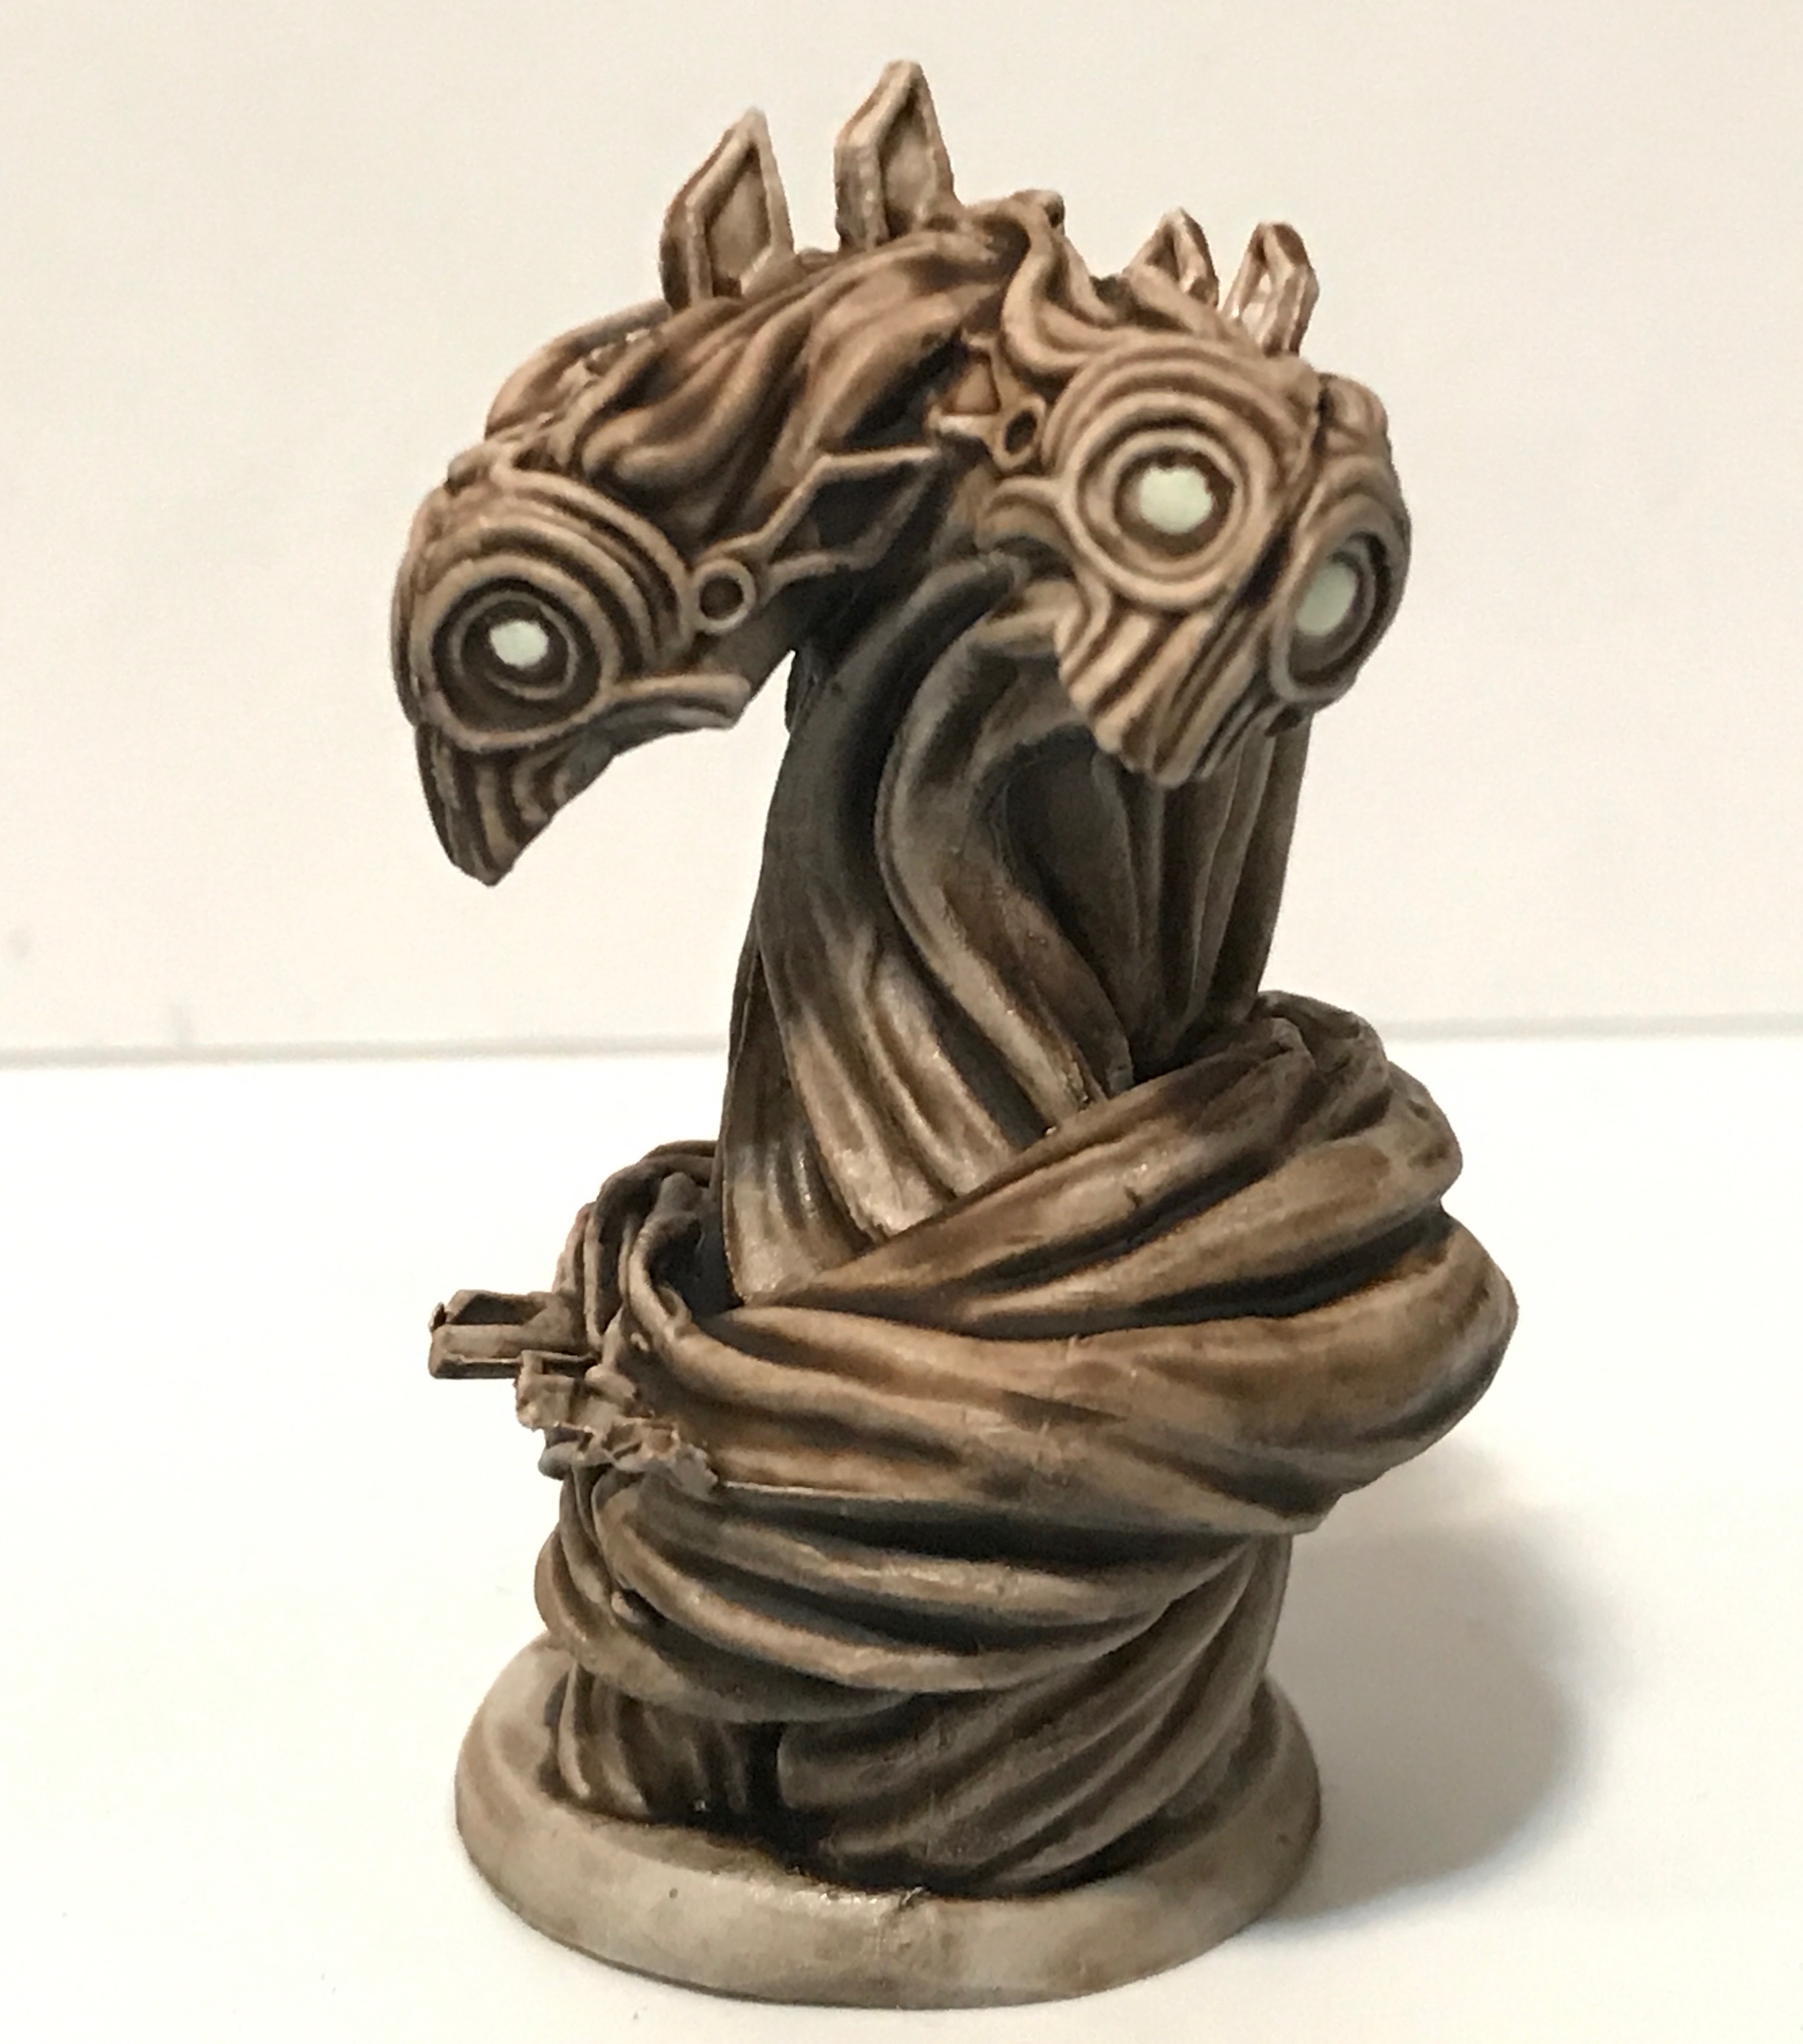
The first two Monsters
I knew I wasn’t going to settle for mono-colored (mono-washed?) minis for the Monsters and the Champions. I was going to stick to washes over zenithal prime, but I wanted to paint different regions of each mini with different washes.
If you scroll to the top of this blog post, you’ll see that other Mysthea mini painters made their own color choices. I decided to stick as best I could to choices made by the lead Mysthea artist, Travis Anderson. I started with the Monsters, since the minis were larger and easier to paint.
My first two Monster minis were the ones I felt were the easiest to paint. Kodror is first, and Caerulas is second.
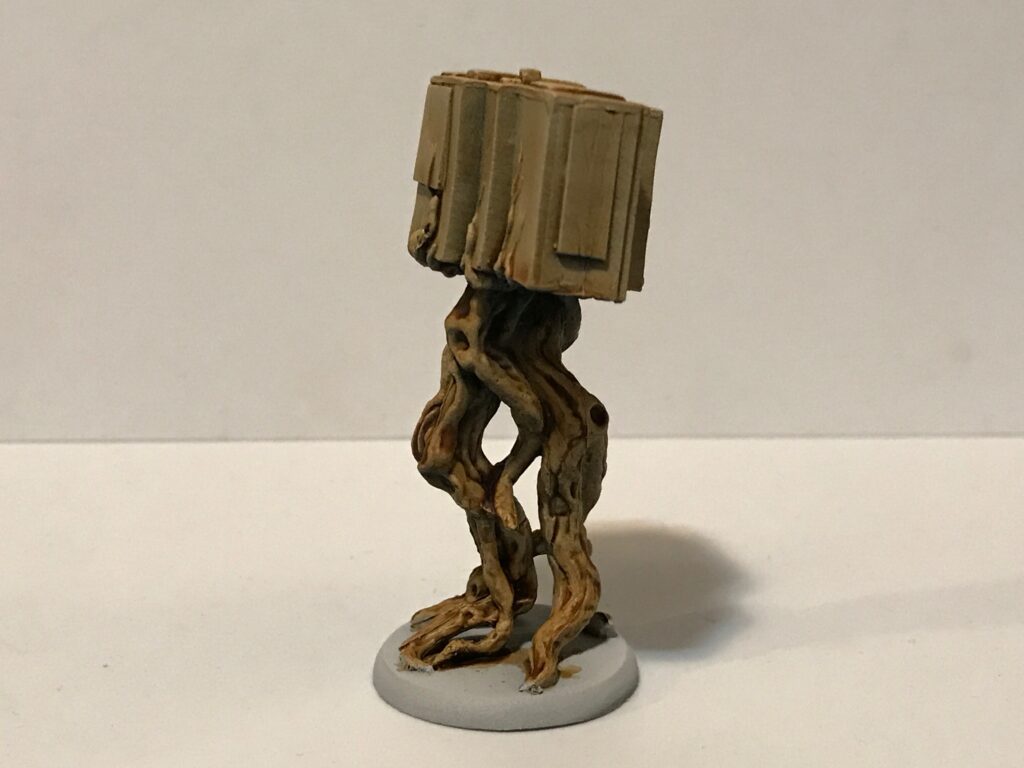
It wasn’t until I published the Caerulas photo on Facebook that I saw the big seam running along the side of the mini. This was a n00b mistake; all the sites and videos that talks about prepping minis included inspecting the minis for any seams. It was an understandable mistake, though. The Mysthea minis were so detailed that it was hard to notice a manufacturing seam until the washes brought it out.
Could I live with it? I should have, but I didn’t. I bought a miniature file kit, filed down the seam, and repainted the mini from scratch, primer and all.
I later noticed other seams on the minis, always after I’d painted them. Those I let go. None were quite as obvious as the one on Caerulas.
“Over-graying”
This is where I was at this point, with all the Golems, Troops, and two monsters painted, and with all the other minis zenithal primed.
It was then I realized that the depth of the zenithal shading was not as great as it had been on the first few test minis I painted, like the ones you can see near the middle of this post. The more recent minis seemed “over-grayed,” with less black shading or white highlighting visible.
I think there are some related reasons for this:
- I may have gotten too efficient at airbrushing for my own good. When I was new at airbrushing, it took me longer to switch the brush from black to gray to white paint. Once I reached the point where it took me less than a minute to run cleaner through the airbrush, the paint from the earlier coats may not have had enough time to dry.
- I may have gotten over-enthusiastic about applying the paint (especially since I only had so much time in each airbrushing session before my eye started aching). I probably applied coats that were too thick, which increased the drying time.
- Getting the right consistency for the primers was difficult for me. The general rule is that airbrush paints should have the consistency of milk, but I left my lacto-consistency meter in my other pair of pants. At least one web site I saw suggested that Vallejo primers are of airbrush consistency right out of the bottle. I was more cautious, and went with primer:water:flow-improver of 10:3:2. Maybe this was too much thinner.
- Part of the reason why the white highlights were not strong enough may have been that the white primer needed to be thinned more; I was told that this is because the bits of white pigment in acrylic medium are larger than the other colors.
-
To speed things up and to get some consistency between sprayings, I pre-mixed my primers and thinners in squeeze bottles. Here’s how it looked.

This means that if I made a mistake in the ratio above, or it encouraged me to speed things up and not let the previous coat dry, that error would persist across multiple airbrush sessions.
I decided that it wasn’t worth trying to reprime all the minis I’d already painted. When I return to mini painting again (see below), I’ll do more tests on my standard dwarves to see if the problem persists.
The rest of the “bosses”
The remaining Monster minis had smaller areas than the first two for me to paint. I dealt with this problem by getting an illuminated headband magnifier [1]. I also improved my toolkit by getting a better set of brushes and a separate drybrush.
Here are all the monsters, in a shot I call “The Merry Mysthea Monster Marching Society” for reasons that only old comics fans will appreciate.

Again, you can compare these to the Mysthea Monster artwork to see how close I came.
Working with the larger Monster minis helped me to develop better brush control. As a result, I had some confidence I could work with the smaller Champion minis. Here are two of the best, Anuth and Sanya.
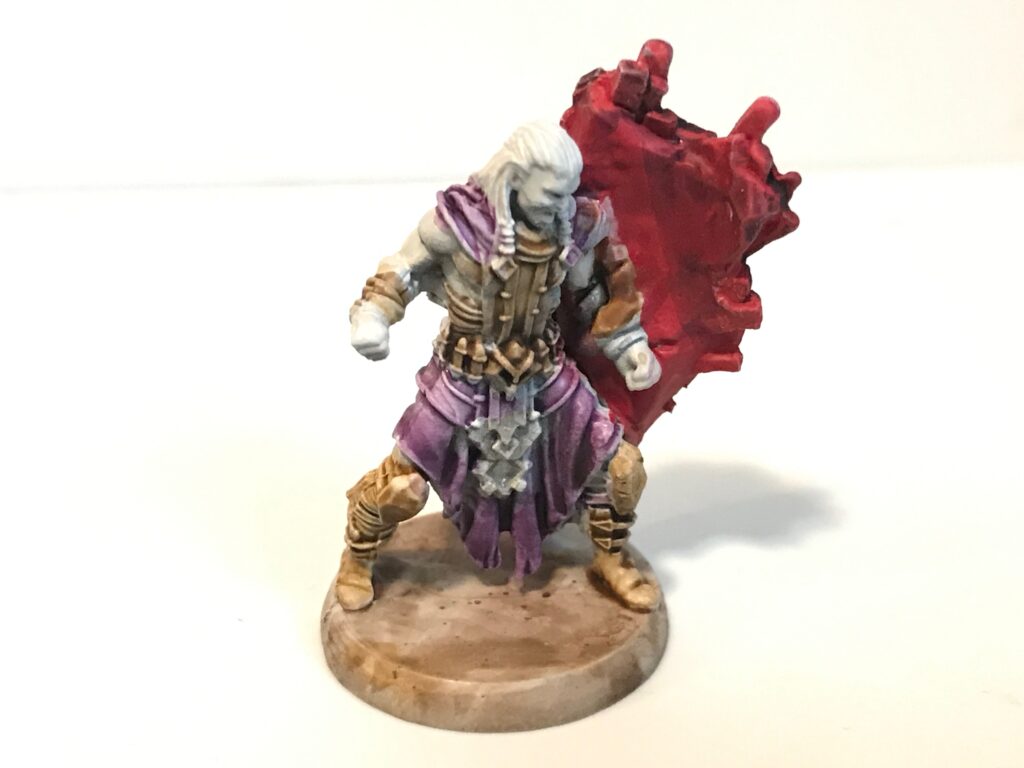
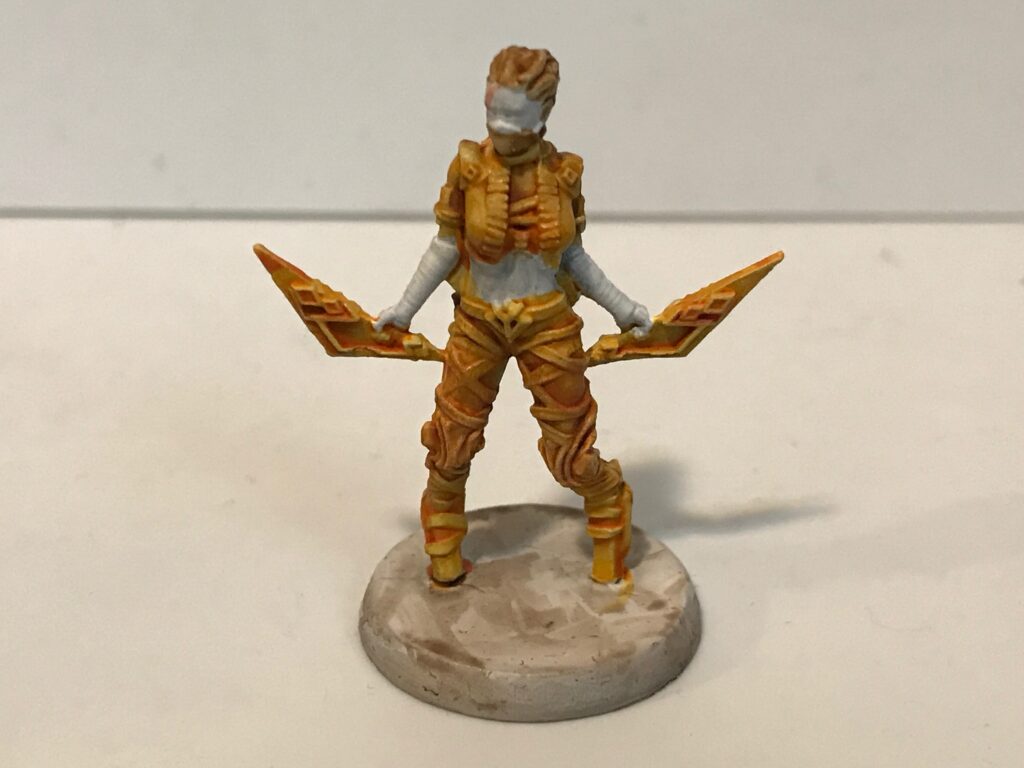
The female Champions offered me an esthetics issue. In the Champion artwork, the females follow the usual fantasy trope of showing more skin than the male figures (because nothing protects from a broadsword blow like a bare midriff). The miniatures follow suit.
Should I have painted over these sections of skin with the same paint I use for the armor? It would have made things easier on me, and it might make the figures look less sexist.
In the end, I decided to go with what the artist originally intended. In part this was because there was some balance: Anuth (see above) has some nice pects and biceps in full view; Celethe shows skin in the artwork but not in the mini.
Here’s the full set, in a shot I call “We Are The Champions!” You can compare these with the Champion artwork [2].

Varnish
These minis are not meant for display. They’re meant to be played as part of the board game Mysthea. Here’s an example.

From a practical standpoint, this means that the players will be handling the minis. I didn’t want them to get their pizza-laden fingers all over my artwork. OK, I’ll admit it: I didn’t want to put my pizza-laden fingers all over the artwork.
The standard solution is to varnish the miniatures. A friend advised me to use satin spray varnish, as a reasonable compromise between a glossy and a matte finish. I purchased a can and prepped the entire collection by using poster tack on cardboard.

A couple of days ago as I write this, the temperature was high enough and the humidity low enough for me to take these outside and apply a couple of light coats, two hours apart. Now I’m letting them dry in my kitchen for another couple of days before I put them back in the box, ready to be played.
So what’s next?
Within the next 3-4 months, Tabula Games will release Volfyirion, which I helped to Kickstart. For those willing to pay extra, the game will include a 120mm (4.7″) dragon miniature. If you don’t like to click links:
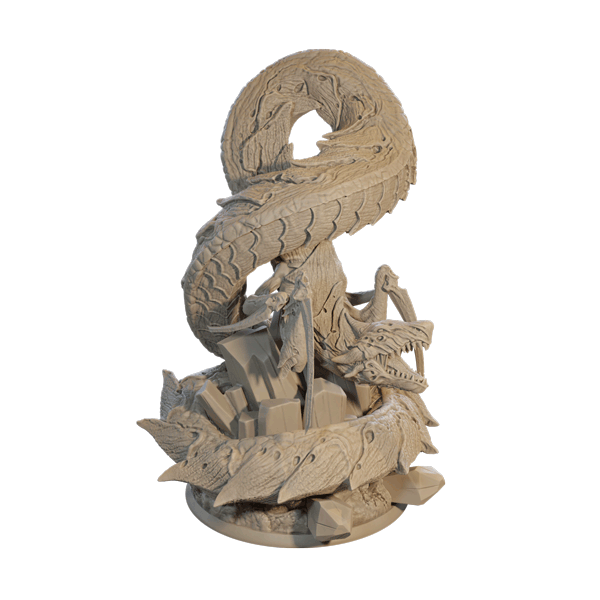
Before I started this project, there was no way I could have painted this. Now I’m already planning what to do.
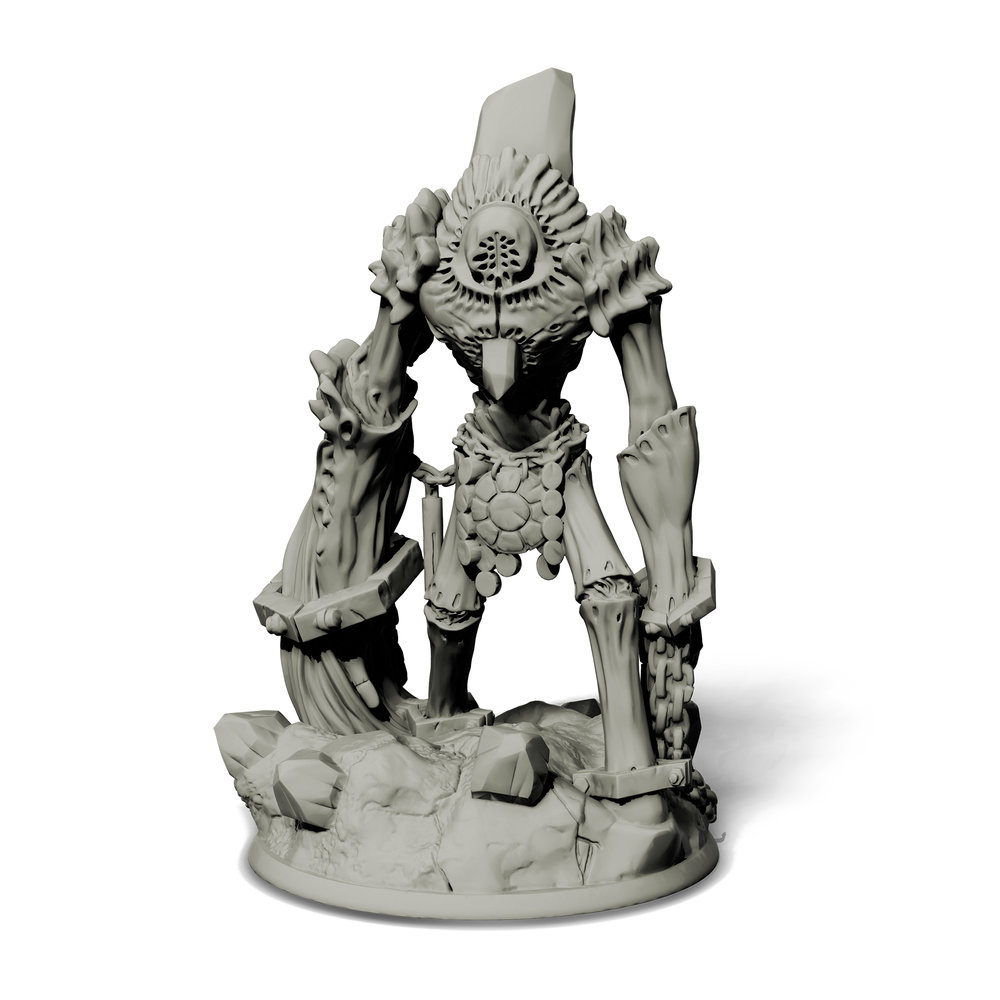
In May, Tabula’s follow-up game to Mysthea will begin its Kickstarter campaign. It’s called Icaion. It will have its own set of miniatures. Tabula has already released a few designs, including that of The Colossus.
These games are not only interesting to me because of their minis and their mechanics, but also because of the way they fit together. They all share the same world background, but what’s more fun is how the games interact: the Volfyirion dragon can be used in Mysthea; game pieces from Mysthea and Icaion can be combined together to play a third game.
When the time comes, I’ll be ready to paint. I hope my gamer friends will be ready to play.
Footnotes
[1] If you put together the hints I’ve dropped about vision issues, you may ask why I didn’t put this project on hold until my vision improved?
The answer is that this project was meant to occupy my time while I was home-bound due to a different medical issue. I needed to be stubborn and push this through because otherwise I didn’t have much else to occupy my thoughts except binge-watch TV.
Besides, although this project is the basis of one of the longest blog posts I’ve ever written with more pictures than I’ve ever included, it didn’t take all that much time. I worked on it perhaps a total of an hour a day, in 10-15 minute intervals before my eye started aching and I’d have to rest it for an hour or two. Most of my “eye time” was spent working from home which had similar limitations.
So although the project took me about six weeks, the actual total time was probably 40-50 hours, including the time painting over my mistakes.
[2] If you didn’t click on the artwork link: My leaving the skin areas of the Champion minis unpainted was not due to laziness or because I never bought any flesh-tone paint. In the original art, the Champions’ skin is either white or very pale purple. I decided the best way to emulate that was to leave any exposed skin, including the faces, the same color as the zenithal primer.
This is one of the most popular posts on this blog. Therefore, my conscience demands that I mention that I get a tiny pittance if you click on the Amazon product links and purchase something through them. I feel this is okay to do, because I have no soul.
Pingback: Sundrop, tan zenithal, and contrast paints – The Argothald Journal
Pingback: Vindication of the Dragon at the Edge of Darkness – The Argothald Journal
Pingback: Contrast Paints, a Golden Dwarf, and Contrast Medium – The Argothald Journal
Pingback: Etherfields Wave 2: Zenithal Prime and Contrast Paints – The Argothald Journal
Pingback: Vallejo shifters, space dwarves, and ISS Vanguard – The Argothald Journal